A “best practice” refers to a method or technique that is widely accepted as superior or most effective in a particular field or context. Best practices are established through experience, research, and consensus within an industry or community.
Cabinet Artists should follow these best practices in order to create cabinets that runs smooth on the VR gallery.
Warning
Readings
Required
To advance in this topic you should learn the CDL the Cabinet Description Language
Further readings
The CDL best practices checklist and the CDL troubleshooting guide.
Optimizing Cabinets for VR Rendering
If you’re reskinning default cabinets, you’re good to go and don’t really have to worry about this, you can move on to Choosing Good Texture Sizes - The Powers of Two
If you’re making a cabinet from scratch: That’s awesome! Here’s how to keep things as performant as possible.
Minimize Unique Meshes
Cabinets are a series of meshes with materials (textures) applied to them.
The less separate meshes with unique textures, the faster your cabinet will render.
For example, if you have a cabinet where each individual button, stick, and decorative part is a separate mesh and texture/color, this can negatively affect the frame rate when put into a scene. Even if the meshes and textures are super simple! VR hardware can draw a lot of polygons and textures, but when it has to stop and switch the mesh and material, it takes a huge amount of time.
This problem compounds quickly. If you have a room full of cabinets with hundreds of unique meshes and materials, that’s going to add up and make for a jerky frame rate.
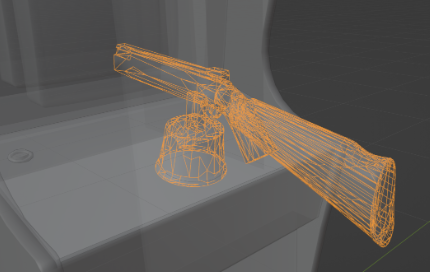
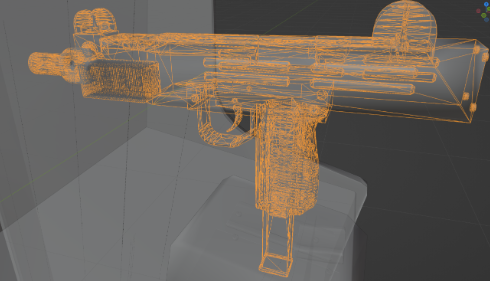
 The Operation Wolf cabinet on the left has about 30 mesh components, while the Chiller cabinet on the right has 16. Try not to go above 35; the lower, the faster the cabinet will render (given a good polygon count).
Basically, good planning from the beginning and laying out your cabinet’s UV coordinates from the start is key here, but that’s way beyond the scope of this document.
TLDR: 2-5 meshes with high resolution textures will render hugely faster than 20-30 meshes with simple textures.
Check that normals for each part point outside, or the part will be invisible in AOJ. In Blender, use the ‘Face Orientation’ view. Blue is good, red is bad.
 |
|---|
| This picture shows the ‘Face Orientation’ view in Blender. |
Shade Smooth
Use the ‘Shade Smooth’ function in Blender to make simple parts appear rounded, instead of increasing polygon count for curves. (In Object Mode, select object, right-click, select ‘Shade Smooth’)
 |  |
|---|---|
| This picture shows simple parts with visible angles. | This picture shows the same parts after applying ‘Shade Smooth’ |
Exporting
A few more tips using Blender. Before exporting your GLB model, in Object mode, select all the parts of your cab EXCEPT the coin-slot, screen-mock-vertical, and screen-mock horizontal. Press ctrl+A, then click ‘All Transforms’. This action will reset all the parts to the same scale, rotation, and origin. This will help prevent display problems later in Age of Joy.
I recommend exporting your cabinet.glb with no textures or materials embedded, I have found this to be problematic.
Keep your Polygon Count Reasonable
Polygons add up! Cabinets are boxy things, which is great for low polygon counts, but sometimes we have curvy pieces like gun barrels, steering wheels, etc, and this is where we can affect frame rate.
When you’re making these pieces, keep the number of subdivisions in mind. Any individual mesh component that’s over 10,000 polygons might warrant a second look.
 |  |
|---|---|
| The Chiller shotgun is about 8000 polygons, which is very performant | The Operation Wolf gun is about 27,000 triangles which is a higher count, but has lots of intricate detail. Since the player will be holding this close to their face and inspecting the model close-up, this is detail that’s well spent. |
Choosing Good Texture Sizes - The Powers of Two
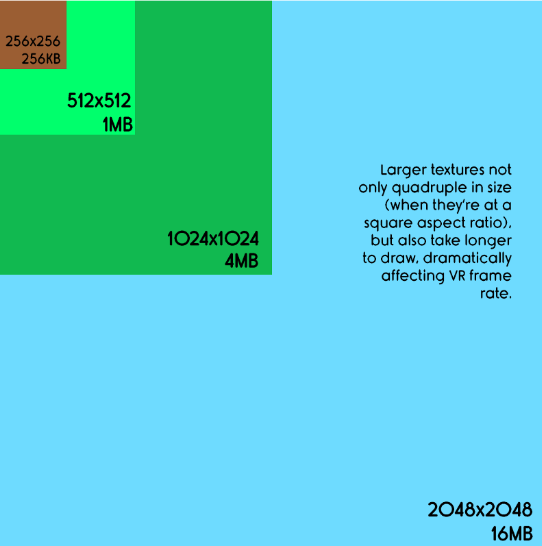
For most cabinets, choosing good texture sizes is the #1 most effective way to optimize your cabinet. Most rendering hardware prefers texture sizes that are powers of two:
2, 4, 8, 16, 32, 64, 128 256, 512, 1024, 2048
Good Examples: 512x512, 1024x256, 64x512 Bad Examples: 510x510, 1030x300, 60x400
Let’s say you have a texture that’s 578x800.
The game engine needs to convert your texture into a format it can display, since it can’t just use a jpeg or png file as-is. It needs to round up or round down the dimensions to the next higher or lower power of two, so it matches those numbers above. What we want to do is to make good use of texture memory, and round DOWN the horizontal pixels to 512, and round UP the vertical pixels to 1024. (PPI can be ignored and has no effect on anything.)

 | What the heck? It’s squished! But actually okay, because the texture will still render at the correct aspect ratio because it’s using the UV coordinates on the 3D model. |
|---|---|
| OK, I get it, so the image size should use those numbers above, and some aspect ratio stretching is okay and will look correct in-game. Now what? Now you need to do the fun part, which is choosing texture sizes. |
Choosing texture sizes
Here are some recommendations:
For really small components you can even go down to 64x64. What you want to avoid is putting a 2048x2048 onto small components, or using really high texture resolutions for textures that are basically flat colors. (If a component is literally a flat color with no detail, using an 8x8 texture isn’t crazy at all). Flat colors can be designated in the yaml with a color code, no texture is necessary.
Poor quality textures can be A.I. upsized (try Upscayl, free and open-source ), which helps to clean up the image, then downsized using the power of two rule.
This is a step that takes advantage of your powers of perception. A good rule is to keep reducing the texture size until the difference becomes noticeable.
Again, texture sizes add up! 2048s absolutely hog memory, and should be used sparingly.
The below shows memory usage:
Should I save it as a PNG or a JPEG?
This won’t actually affect how much memory the texture takes up in the game itself, since the image has to be converted into a texture once it’s loaded. PNG can result in a larger zip file size for the cabinet, but the resulting texture will generally be better quality in the game. If you’re trying to make a super tiny cabinet size for some reason, use JPEG. Save textures as optimized PNGs to save a bit of filesize.
Use ASTC texturess when possible.
What about 4K textures?
We’ve done profiling and have confirmed that if you send a 4K texture to AOJ, the Unity engine refuses to use it and bumps it down to a 2K texture, so it’s just going to make the cabinet’s zip file bigger.
“I’m not sure I can edit my cabinet art if I have to do it all squished…”
Think of the resizing as the last step. A lot of people just have an “Export” folder where they keep their initalized textures.
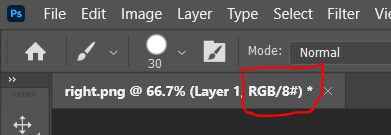
Edge Case: Indexed Color
In certain edge cases (or if you’re modifying an existing cabinet to make sure it fits the power-of-two specifications), you might notice that some textures are stored as “Indexed Color,” which reduces color depth to 16/256 colors to save space. You can tell an Indexed color image when it appears like this in Photoshop:

Since the Quest will ultimately be reading these textures as full RGB color, we should change the color mode to RGB. (Also, resizing Indexed Color images can have much worse results than resizing RGB images.) To switch to RGB, just go to Image → Mode → RGB Color.
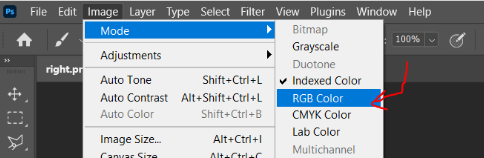
You’ll be able to tell it worked when “Indexed” changes to “RGB.”
Loading a Cab for the First Time…
So now you’ve built your cabinet, or going to use an existing one, gathered your artwork, and it’s time to upload it to AOJ. This can be a frustrating step when things go wrong, as AOJ offers little ln the way of troubleshooting (current AOJ v0.5).
The description.yaml is the critical element here, as formatting errors, even a single one, can and will cause problems, guaranteed. The best practice here is to use a description.yaml from a cabinet that you know works in AOJ, then edit that file with entries that match your cabinet.
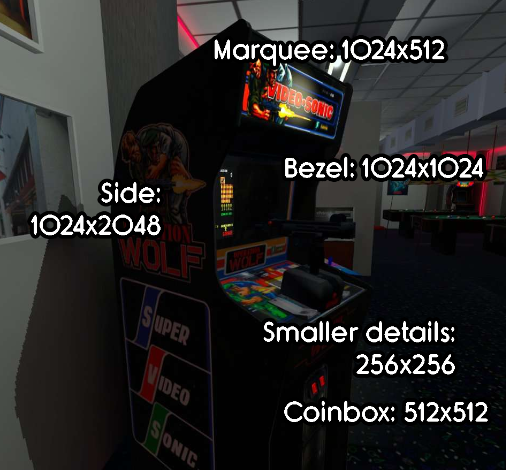
Your cabinet model MUST have the following parts. They are left (side), right (side), marquee (top panel), bezel (the part in front of the screen), joystick (the control panel), front (front panel), screen-mock-vertical (the vertical video screen), screen-mock-horizontal (the horizontal video screen), screen-base (a panel to block the view through to the back), and coin-slot (to put in the virtual coin to start the game). These parts may or may not have art assigned to them, but they must ALL be present and named correctly in your cabinet.glb model, including both type video screens, even when your game will only use one of the screens.
Best practice checklist:
- You’ve checked your model for correct normals and reset scale, rotation, and origin. (EXCEPT for the two screens and coin-slot, leave those parts alone)
- Your
cabinet.glbmodel has all the required parts, named correctly. (existing cabs that work in AOJ have all the required parts) - Your art files have been saved as PNG (preferred), or JPG using the rule-of-two, video files saved as MKV or MP4. Using ASTC textures will improve a lot the performance, but requires a extra effort.
- You are going to edit a known working
description.yamlfrom an existing, working cab. (the formatting of the yaml is CRITICAL) - Set CDL Debug mode and Debug mode if needed.
- Check the CDL best practices checklist
Author: @Geometrizer